Liverpool v Chelsea match analysis: Bastard free kick not enough for Chelsea

The “bastard” free kick and amazing penalty save from Mignolet put a stamp on the most interesting Premier League clash of the week which ended the nightmare Liverpool was experiencing this month.
Chelsea came to Anfield at the worst moment for the hosts who barely won against a fourth division team this year. Even for that they needed second leg replay. Liverpool had lost three consecutive games, dropped out of two cups in three days and had to face the best team in country.

However, Liverpool had already beaten Chelsea this season and the good news was that Sadio Mané finally returned from the African Cup of Nations and the whole squad was fit to play. Chelsea, on the other hand, had few problems before the match. All players fit, excellent form this year with only a loss against Tottenham. While Liverpool had a lot to lose in this match, Chelsea could take it calmly, keep tight at the back and wait for their chance and that is exactly what they did.

image-1
Chelsea sitting tight at the back letting the hosts keep the ball

They sat back leaving Liverpool with the ball and little idea how to break down the defense.

IMAGE 2.jpg
Liverpool game plan involves a lot of movement of midfield and forward lines in order to create the right sequence of passes and movement to get into a scoring chance. A difficult task against so well organized opposition

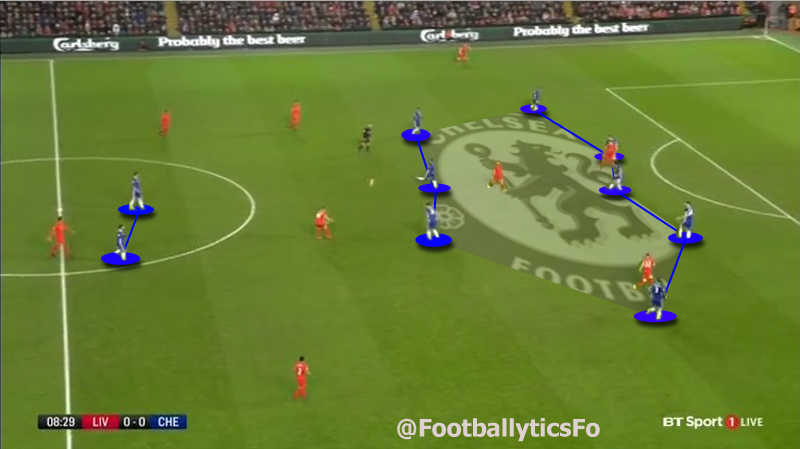
If we look at the same image from the Liverpool perspective we see the general idea Liverpool uses in their attacking third. Forwards (red lines) constantly change places. Coutinho is dropping back while Firmino and Lallana are more flexible and take turns in dropping deeper and making forward runs. In this instance it is Lallana who starts from deeper position and makes a run behind the defense.
Midfielders (blue lines) operate under broadly similar principle. Henderson plays as a holding midfielder while Wijnaldum and Can are making turns in forward runs from deep. In this instance, it is Can who breaks behind the Chelsea midfield line.

image-3
Liverpool went down the left side in order to reach the middle third which they did very effectively. However, Chelsea was as effective at limiting their passing lanes in the attacking third (source: @11tegen11)

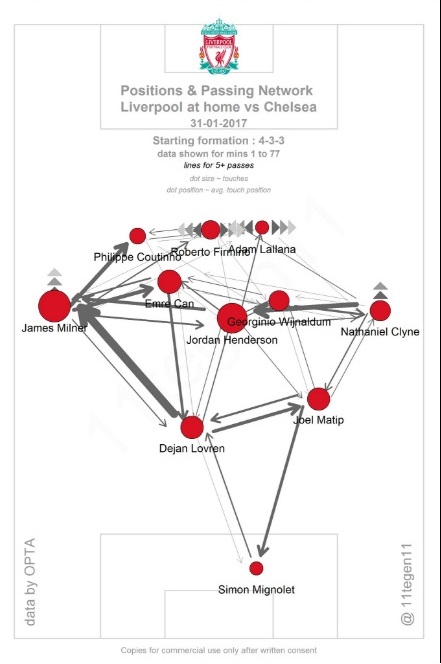
Above we see the Liverpool positions and a passing map that reveals James Milner as a link between the defense and the midfield. If you keep in mind the Chelsea formation that is quite a reasonable choice as down the flanks Liverpool has natural man advantage. However, once the ball gets to the central area, to Coutinho and Jordan Henderson, links between players perish.

image-2
In first half Lierpool persisted at trying to break the defense via movement in central area

If you get back to the second image, you see why as well. Eight Chelsea players are behind the ball and three most advanced Liverpool players are cut off between them. The only space Liverpool has is in wide areas and Chelsea is happy to concede in order to keep the middle of the pitch sealed off.

Note also the positioning of Diego Costa and Eden Hazard who are both high up the pitch not participating effectively in the defensive phase at the moment.

While Liverpool did well without the ball, closing Chelsea down and forcing mistakes and clearances, they had a lot of trouble getting in the goal scoring position.

However, after conceding that free kick, Liverpool was playing quicker, with more will and desire but didn’t substantialy change their approach. They were always looking to get into scoring position by outplaying packed middle.

The second half didn’t see a significant change from Chelsea but Liverpool made an important addition to their attempts to penetrate the defense.

IMAGE 4 .jpg
A shift in fortunes happened as Liverpool added a new way to get into the box. A diagonal ball to the left side after overloading the right flank finally unlocked Chelsea

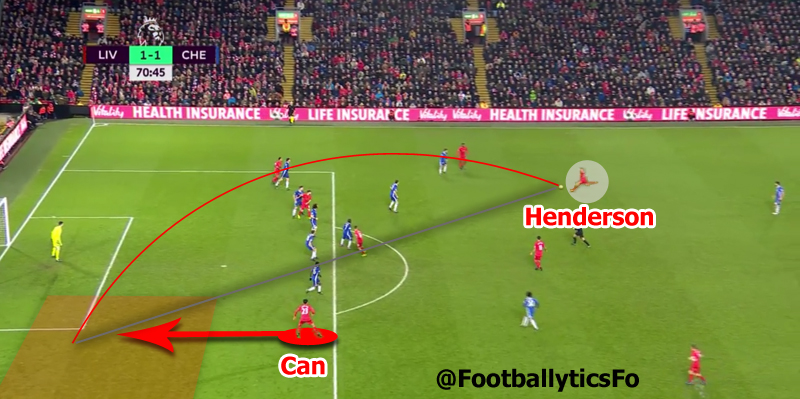
Liverpool recognized a weak spot in the zone defended by Moses and Azpilicueta. There was not only a potential height advantage when Can made his forward runs in the area, but also a weak link when Liverpool would overload the right flank and quickly shift the ball to the other side – behind the back of Moses.

This move was performed four or five times and each time it was more dangerous than anything Liverpool did in the first half.

Once Liverpool equalized the match went into the realm of will and work rate and both teams were on brink of scoring. Chelsea kept the pressure on counter attack with great help from Kante who managed 16 successful tackles (of total 29) in a match that sprung quick counter attacks. Liverpool, on the other hand found confidence after scoring and kept pushing.

IMAGE 5.jpg
Expected goals (xG) tekk us that, on normal day, Chelsea would need three matches to score a goal from chances they had created against Liverpool (source: @11tegen11)

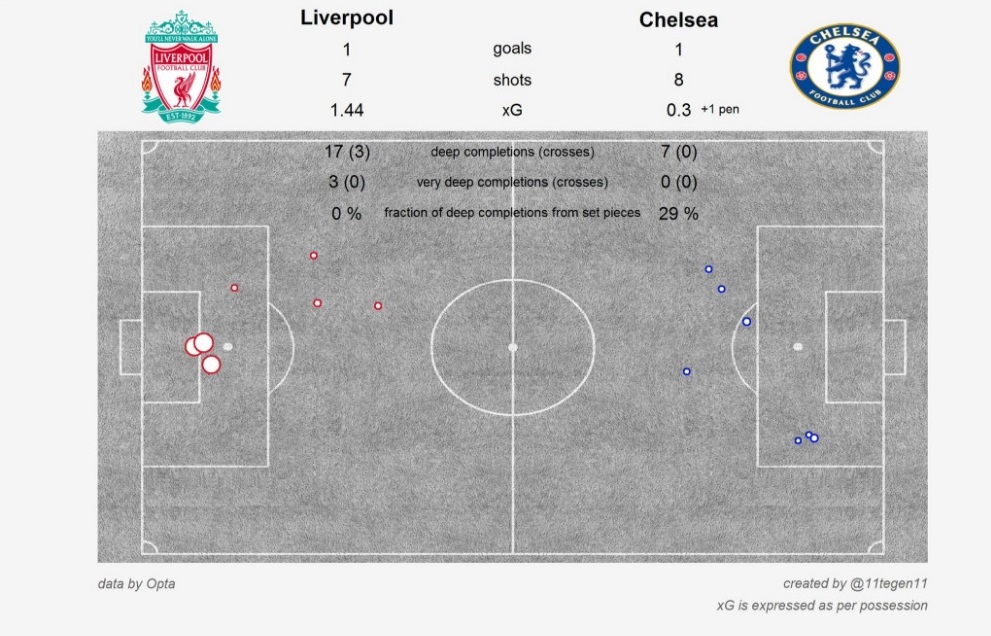
Image above expresses the expected goals from created chances. You can see that, despite everything, the hosts created much more than Chelsea with 1.44 goals against 0.3 (penalty not included). Numbers tell us that, on average game, Liverpool would certainly score a goal from created chances while Chelsea would need three matches to get lucky enough and convert one of their chances into a goal.

However, football isn’t statistics only and the situation on the pitch is heavily affected by the result. In the end, Chelsea got what they wanted while Liverpool will be happy to have avoided the fourth defeat in a row.


This analysis was first published at soccerspecific, a coaching education platform with the mission of creating and sharing the highest quality of coaching information in order to positively impact player development around the world.

Mistakes Mourinho made against Conte, Chelsea v Man Utd analysis

A lacklustre performance from Man United helped Chelsea to a high scoring win while Jose Mourinho made one key mistake even before the game. Although the way United played would sooner or later provide opportunities for hosts, rather strange goal opened the match steering it into one direction.
Encouraged by the win in Europa League and very sound performance against Liverpool, Mourinho went to Stamford Bridge ready for yet another defensive minded match. He essentially tried to emulate the defensive performance from last week. However, while 6-3-1 worked very well against Scousers, it was doomed when it faced Conte’s team.

liverpool-v-united-defensive-shape
Encouraged by a sound performance in defence, Mourinho tried the same plan against Chelsea

Above you see United (blue shirts) in their defensive shape against Liverpool. Main reason this worked so well is due to nature of Klopp’s team. Full backs Clyne and Milner are designated to provide width while Mane, Firmino and Sturridge are all staggered in central areas. That is not so different to Chelsea front three, although Hazard has more liberty in his movement than Firmino as the latter usually doesn’t interfere in Mane’s space.

Compared to Liverpool, Chelsea players are occupying better positions to deal with Mourinho’s defensive block. While wing backs, Moses and Alonso, are in same positions as Clyne and Milner, it is the midfield that is making the difference.

passing-pattern-liverpool-and-chelsea-v-man-utd
The key to Chelsea’s success against United is their patience and flat spaceing in midfield (source: @11tegen11)

Above is the passing and positional map of Liverpool and Chelsea playing against Man United. Liverpool was whole match trying to pass the ball quickly to Firmino who would then get caught in the traffic (lost 21 balls, double than any other player in the match). Both advanced midfielders, Can and Coutinho, were very high up the pitch and struggled to get control of the game. The third man, Henderson, remained behind them in holding position.

chelsea-v-liverpool-flat-3-midfield
While Liverpool tried to attack with midfield triangle (Henderson-Coutinho-Can), flat and deep trio of Chelsea created numerous 3v2 situations allowing them what Liverpool couldn’t master. A control and threat in build up

Chelsea, on the other hand, did things differently. Azpilicueta and (occasionally) Cahill were joining Kante and Matić in the middle from defensive line. This move created numerical parity in the centre of the pitch. Crucial thing happened when the ball switched to left or right. Deep and flat position of three men in midfield (unlike Can-Henderson-Coutinho triangle) created pockets of 3v2 situations in half spaces. While Manchester United might have been rather unlucky to concede after few seconds and then from corner, those 3v2 situations really killed them off.

In the second half Mourinho switched to 4-4-2 as Fellaini was dropped for Juan Mata. This didn’t really influence their approach in attack. As in the first half, United was often found overloading left side and then shifting the ball to Valencia on the right wing for a cross. Although he provided few good crosses targeting rather short Azpilicueta, nothing came of it. Their defensive plan failed to cope with three deep central midfielders as well. In fact, it was these situations that created last two goals Conte’s team scored.

chelsea-v-man-utd-hazard-3-0
Hazard-Kante-Matić-Hazard, three players use numerical advantage to take out two Liverpool midfielders and score

Above we see the 62nd minute and nice 3v2 overload on the left side. Mata and Herrera naively follow first pass from Hazard to Kante and then for Matić. This creates space to exploit for Hazard* and Chelsea was three nil up effectively sealing the game off.


chelsea-v-man-utd-kante-4-0
Same thing in the right half space. This time is Kante-Azpilicueta-Hazard-Kante sequence that takes out Blind and Pogba and allow central midfielder to enter the box and score with most obvious fake shot in history of Premier League

Ten minutes haven’t passed and same situation occurs in the right half space. Three quick passes from Kante to Azpilicueta and Pedro (not Hazard as the frame wrongly says)** pull out of shape Pogba and Blind while last pass from Pedro back to Kante creates space for Kante to exploit. Yet another 3v2 that unlocked unprepared United defence. It is rare occasion to see basic stuff from training pitch that works so well and consistently during a competitive match.

To conclude, encouraged by good defensive performance against Liverpool, Mourinho went to Stamford Bridge hoping to repeat the result. However, he failed to adapt his defence to Chelsea’s offensive style and paid dearly. Even if Chelsea didn’t score that early goal and corner, lack of attention to Conte’s midfield would catch him sooner or later. Inability to adapt the defence to that midfield three was crucial to the result. It will be interesting to see how Mourinho reacts to this heavy defeat in two days when he plays the derby against Guardiola. Chelsea will, on the other hand, find new belief in their manager and his ideas after such a comfortable win. A crucial thing in a long journey of creating a bond and trust between the players and the manager.

*and ** – thanks to Sarcasmatican from reddit football tactics community for rectifying these two mistakes!

Gallery

EPL: Chelsea v West Ham analysis

Last opening game of Premier League season featured two highly anticipated teams. “Chelsea Reloaded” with fresh blood, but above all, with tactical mastermind Antonio Conte. On the other side, if there was no Leicester miracle last season, Slave Bilić’s West Ham would be the story of the year. It was great tenure at Juventus where Conte was winning everything he could in Italy and exceptional run at EURO that made Conte world class tactics expert. EURO was particularly interesting as Conte missed semi finals on penalties with mediocre squad put into masterful tactical approach. Expectations and hopes are high for Chelsea and first match was highly anticipated. West Ham, on other hand, had a great season with Slaven Bilić and game against Chelsea was there to establish his foothold on new season. First quarter of an hour seemed like West Ham could play on even terms with Conte’s Chelsea, but after clock came to about 15th minute the tide turned.

Highly structured and coherent Chelsea team gave little room to West Ham who started losing balls, miss controlling passes and all the possession went over to Chelsea. In absence of Dmitri Payet, a man who can hold on to ball and look for that dangerous pass, West Ham relied more and more on long balls to their target man Andy Carroll. However, all the rebounds, second balls and challenges went Chelsea’s way and slowly they established dominance. At that point patterns started to emerge.

Conte obviously believes he has an extraordinary player in Eden Hazard. A man who is quick with the ball in his feet and can turn around any defender, winger who is equally capable of seeing a pass and executing it, a man who is able to create the difference on the pitch. To give him opportunity to have time and space on the ball in order to do what he does best, Conte ordered majority of attacks down left, Hazard’s side. To make his life easier, Chelsea manager shifted most of his players closer to him.

SLIKA 1
As with Italy, Conte leaves the middle of the pitch and focuses on flanks

You can see above how left side of the pitch is crowded by four Chelsea players ready to receive the ball from Oscar. It is the set up that was seen again and again throughout the match. Conte is deliberately vacating the middle of the pitch to opposition, a thing he successfully employed in recent Italy campaigns at EURO.

Once the ball gets to left to Hazard, he has few options. Quick combination play with team mates, solo run or splitting pass to escape two wide opposition players and get on goal. However, if this doesn’t seem likely, Chelsea often opted for retaining possession, a novelty compared to Italy style during EURO.

chalkboard (1)
Oscar has a deep lying playmaker role and in transition from defensive third he drops to RB position to pick the ball and move it into the middle third. Center of pitch is left to opposition while players overload left side to allow options for Hazard

Above is the diagram of Chelsea transition from defensive third into the middle third of the pitch. Runs from Ivanović and Willian are only a decoy while bulk of players shift to left to give support to Hazard. This move repeatedly troubled West Ham. Partly due to low work rate from Valencia who isn’t very keen on running after opposition to an extent where, by the end of first half, Bilić was forced to move more energetic Andy Carroll into his slot in order to disrupt the transition. Although it was repeated throughout the match, Chelsea didn’t hesitate to employ right side when occasion presented itself and both, Ivanović and Willian, did a great job on right.

SLIKA 2
When left side overload doesn’t work Chelsea is more concerned with keeping the ball as Ivanović goes inside to offer a passing option. However, Chelsea is already leading here and in first half right back wouldn’t hesitate to go forward aggressively

Above you can see what happens when direct route to goal on left is closed off. There are four players attracted to Hazard and another two tied to West Ham’s right side leaving Oscar completely open in center of the pitch while Willian is waiting for a pass into deeper areas on right. While Conte isn’t obsessed with possession, he is still Italian and doesn’t push his full backs high. At this moment he is one nil up and he is content to keep organized and covered in case of counter attack. With Ivanović going inside to receive the ball from Hazard or maybe Oscar allowing his team to gradually progress up the pitch, instead of hugging the line and going forward immediately.

While Chelsea merited a goal from their combination play and smart possession, it was only a reckless mistake from Antonio who gave away the penalty at start of second half that allowed Chelsea to go ahead. From then on Ivanović stopped venturing forward so aggressively as he did in first half.

On the other hand, West Ham offered little in tactical sense. They were on the back foot throughout the game and were lacking aggression, decisiveness and compactness to take the ball away from their opponents. Their offensive play was significantly disturbed as Ayew had to go off with injury early on as he seemed to be a player with licence to roam around the pitch freely and connect the midfield to attack. After he was out, Tore didn’t fill the same role and West Ham relied mostly on long balls to Carroll.

Only in 70th minute when Payet comes on West Ham changes its shape and goes from 4-3-3 to 4-2-3-1 but French star changed little the fortune on the pitch, although it seems as West Ham got more confident on the ball with him on the pitch. They eventually equalised from set piece when Chelsea went desperate and shifts to 4-2-4 to get a goal minute before the fulltime.

SLIKA 3
After lucky equaliser Chelsea changed to 4-2-4 and managed to squeeze in a winner after great strike from Diego Costa who receives the flick on from Batshuayi who receives a long ball from Nemanja Matić

In conclusion, the work of Conte can already be seen on the pitch. Weeks of pre-season paid off, ironically, it was mistake from opposition and a rather desperate, individual effort from Diego Costa that got them result. West Ham has a long year to prove that last season wasn’t a fluke. However, they showed little without Payet and Ayew on the pitch. Bilić can be content with his defensive shape when they are set up for zonal defending. However, they still lack the cohesion and teamwork needed to go into pressing and winning the ball from their opponents.

EURO: Wales – Belgium analysis: Clueless Belgium

After England and Iceland game, we have seen yet another upset in Euro quarter finals as Wales surprisingly easily dealt with heavily favoured Belgium side. Although for different reasons, both favourites got an early lead and failed to progress against “smaller” side. While England succumbed to pressure, Belgium seemed to have no coherent plan how to beat their opponents to begin with.
While Wales came into the match knowing it will be a hard battle they prepared for it, while Belgium seemed confident their quality in attack will be enough to cover for depleted defence. However, it was their attack that really disappointed and not the defence thatconcededd three goals. At times it seemed asWilmotss was playing a match of FIFA on playstation, passing the ball to Hazard and hoping he will dribble it into the net eventually.

However, the game started rather confusing for Wales. Joe Allen lost couple of balls as he passed horizontal long balls, an action that is under “Don’t do it” section in football manual. Apart from dubious passing decisions in possession there was a lot of confusion in early minutes in Wales defensive positioning.

wal def confusion
Wales started off a bit unsure. Theri passing and defensive positioning was dubious at times

Davies is completely distracted leaving Carrasco on side, Bale is pushing forward instead of covering Witsel and huge space behind him with Lukaku and Meunier completely free to receive the ball. In this instance Nianggolan chose to ping a long direct ball to Carrasco. However, he is so late in his decision making that, despite the hiccup in Welsh defence, right winger ends up in off side.

Opening 15 minutes were plagued by Welsh poor defensive positioning and soon after, instead closing down Nianggolan, Ramsey decides to cover the goal. That produces one of the best goals of tournament as Nianggolan hits a thunder strike into the top corner.

At that moment psychology started to influence the game heavily. Belgium seemed as they thought that Nianggolan’s individual brilliance is just a small part of what is to come while Wales actually picked themselves up defensively. On offence they were quite dangerous already.

possession  between goals.jpg
After conceding, Wales picked up and controlled the game till the half time

However, above you can see how much more of the ball Wales had between 12th, when Nianggolan scored, and 30th minute when Williams got an equaliser. While Bale initially started on the left side of Robinson Kanu he slowly moved to right as somebody has reminded him there is young Lukaku Junior, Denayer (making his début at EURO) and Hazard who doesn’t track back.

wal counter lb out of pos
Belgium had trouble tracking runners from deep and coordinating their defensive line

Just a minute before conceding Belgium allowed one of characteristic counter attacks from Wales you can see that above. Belgium lost the ball and failed to track back into defensive position. Quick play sees Ramsey in possession and, within three touches, Bale is released behind the defensive line. Hardly any of Belgium players are in good defensive position. Hazard is notoriously released from tracking back, Lukaku is completely out of position while the worst is Denyer who can hardly deny a pass to Bale with his body orientation and positioning so close to Alderweireld.

Everything that went on for Wales went over Ramsey and Bale. Bale was crucial moving in half spaces from deeper positions while Ramsey was designated as the link between midfield and attack. This link was so effective due to clever movement by Welsh players, however, a lot of credit goes to Marc Wilmots’ side.

They were defending extremely deep, probably to deny space for Bale’s runs, however that obviously didn’t work as Bale wasn’t playing on the shoulder of the defenders. He was coming from deep to pick the through balls or for solo runs.

bel poor def positioning
Even when they were in defensive shape, Belgium did a poor job on positioning leaving n umerous opposition to receive a pass

Above you can see how poor Belgium positioning is. Taylor on the ball isn’t pressed by anyone, he has his head high and calculating his options with time. He has Allen, Leadley, Bale and Gunter(on the right touchline out of view) to pick from. Intensity, or lack of, the Belgium defence was appalling. They half bothered to pick up players in their zones of responsibility, defended too deep and let all the time on the ball for Wales to pick their options during whole first half.

At half time it was evident Wales was targeting right flank where Lukaku and Denyer failed to cope with runs of their opponents. They didn’t try at all to disturb Wales’ entering the middle third and allowed easy avenues for Wales to go down right flank.

After initial 15 minutes when they scored, they failed to create anything apart crosses for Lukaku who was lost between three defenders. Only visible attempt to create space was Lukaku dropping deep to open up the space for De Bruyne who was advancing from CAM position. However, that ended in the lap of three center backs. Anything else was up to individual decisions and qualities of their offensive players.

With second half kick off Wilmots made few changes in personnel and their approach to the game. Belgium finally showed intention to close down Wales in their defensive zone in attempt to win the possession a bit higher.

bell press
With second half Belgium started to press high. However, it was again un coordinated and always left a free man

However, this was usually poorly coordinated between Lukaku and rest of offensive trio De Bruyne, Nianggolan and Hazard. Wilmots also substituted Carrasco with Fellaini who was supposed to help Lukaku with those high balls. This brought changes in their shape as well. De Bruyne was moved wide while Fellaini came closer to goal exchanging his place with Nianggolan on CAM position. However, general idea of play didn’t change at all.

As time passed it seemed as intention was to give the ball to Hazard and hope he will do something with it other than get clogged in eight men Welsh wall. Other part of Wilmots’ plan with Fellaini’s presence was to rise the number of Crosses. From 15 in the first half Belgium got to 19 during the second. Only three of total 34 crosses connected. Sadly, there was nothing else to their game. They took away the possession from Wales but failed to do anything with it. Below is still shot of their typical attack.

clueless
With the ball Belgium was as clueless as without it. Crowding the central area and congesting much needed space

Hazard who was playing on the left wing is bunching up with Nianggolan at CAM position while at the same time De Bruyne cuts in from right wing and Lukaku dropping deep. Even Witsel is coming to the party from his covering position. Although Welsh defensive positioning is far from perfect in this instance, they have taken half of Belgium squad out of the game.

In meanwhile, on the other side of the pitch…

goal 2
Poor defending and ineffective pressing led to second goal as Bale passes a direct long ball to unmarked Ramsey

Belgium was poor at defending in first half, but with beginning of second, when they started to press higher up the pitch, lack of defensive cohesion became apparent. As Bale makes a long direct pass for Ramsey’s run, Denayer and Fellaini fail to track while Lukaku is occupied with Gunter. Ramsey is free to run into space left behind the defensive line and another poor defensive display lets Robson Kanu to free himself from three Belgians and score.

As time went on Wilmots and his player were ever more nervous and, as they didn’t have sound plan to attack Wales, things got only worse. Changed to sort of 3-4-3 and then 3-3-4 in dying minutes meant only more confusion as players tripped on each other in front of Welsh goal and in the end another break down the right finished off the game.

To conclude, we can point few crucial moments. Above all it was Belgium that went on the field expecting an easy win after they trashed Hungary. However, Wales defended much better and Belgium ran out of luck and space for their star offence to shine. Furthermore, they were appalling in defence which was, kind of, expected, but offensive class should make up for that. If Wilmots had any idea how to attack.

Wales on other hand didn’t have the hardest job defensively as Belgium worked against itself for the most part of the match. With the ball, however, they did amazing job first half as opposition failed to cope with deep forward runs from Bale and Ramsey. Again, Belgium had their part in it as it was defending very deep and didn’t make an attempt to close higher and prevent Wales from getting to middle third. However, we have seen why in the second half. They are just too disjointed when pressing high to be effective leaving even more space for runners from deep.

If anything, as Belgium commited in attack, they left more space for Ramsey and Bale to run behind disjointed defensive lines.